Tampilkan postingan dengan label to. Tampilkan semua postingan

5 Simple Tips To Build Spider Friendly Blog

5 Simple Tips To Build Spider Friendly Blog

Spider also known as crawler or bot robot. It is used by search engines to find relevant information, from each blog, but not all of the relevant blog. Robotic crawler started its mission from the most popular websites. Robotic crawler continues to add keywords in their list as each link on a blog. In the same way, the robot crawler course also will find your blog. The rules of each search engine / search engine varied or different, but the basic process remains the same crawler.
5 Simple Tips To Build Spider Friendly Blog
I will give a few tips for my friend all the 5 things you need to do if my friend wants pal crawler robot love to be in your site with a blog spider friendly.
1. Robots.txt the Blog.
Robots.txt is the first choice of the robot crawler. Blog will be seen by the robot crawler, if you have these components. Robots.txt is an attractive temptation robot crawlers to consider the blog to be put into the category of quality blog. Every blog should have this component in the main directory so that the robot crawler can find it easily. 2 goals. One, this component is to tell the robot crawler, which pages do not need or do not need to index on the crawl, and two, this component acts as an invitation to draw the robot crawlers to your blog.

How to Insert Robots.txt On Blogs

To facilitate pal, all I also give tips include robot.txt on blogs.

- First paste this URL in the browser address bar buddy:

http://URL.blogspot.com/robots.txt

- After that will appear Robots.txt code blog.
- Copy all of the code.
- Then open Preferences Search Blog Buddy.
-  Unlock special content robots.txt? (SELECT YES)
- Then paste the code had been copied.
- Then click "SAVE CHANGES".
- Robots.txt were all Disabled , has now become Enabled .


2. Use the Right Title, Keywords, and Meta Tag.

The first thing crawl by crawler robot is a title (H1). Robotic crawler will crawl your blog title as instructed pal given attribute heading tags H1 , title and keywords. Buddy had to use descriptive keywords in the title and not too long. The ideal length for the title of the blog is only 60 to 70 characters. Besides the title, Meta tag meta tag is also important because it will deliver a message from your blog to the robot crawler.

For example:

<Meta content = ... name = description />

over the meta tag to make a brief overview of what your blog is.


3. Update Buddy Blog Publishes Article With Method Qualified Regularly.

The next thing is the content of the blog. In this regard, it is important that the friend had to publish quality content or articles regularly. If Friend Doing It, robotic crawlers will visit your blog quite often and of course your blog will automatically get a good ranking. Additionally, the keyword in the title should also be part of the blog messages.

Blogger SEO Tips Tricks Beginners, sending a message to the robot crawlers and visitors that this blog technocraze about SEO.

4. There should Sitemap In Blog Buddy.

Navigation is very easy for a robot crawler, if a blog has a sitemap. It would be easier for the robot crawlers to index your blog, but the sitemap should be in the form of text links.


5. The build quality and relevant backlinks.

Robotic crawler would think that a backlink is very important for a blog. If my friend has a good quality backlinks, robotic crawlers will rank your blog higher. However, backlinks must be relevant and of good quality, if not robotic crawlers will damage the reputation of your blog.

So these are 5 Simple Tips To Build Spider Friendly Blog can apply to your blog as well if my friend thinks that the current blog is not treated well by the robot crawler.

Read More..

Trick to Create fake Facebook Wall

Hello friends,today,once again we have come in front of you with a great facebook trick by which you can create a fake wall(timeline).With this trick you will be able to create a fake wall and will be able to prank your friends.So this can be considered as one of the amazing facebook trick,


So,first of all what is wall machine?The wall machine is a WYSIWYG tool for creating fake facebook walls.WYSIWYG means,what you see is what you get.

So,just follow the steps given below to craete your fake facebook wall

1.Go to this site- http://thewallmachine.com/

2.Select connect

3.You will see a demo status with demo comments by celebs or likes by them.Click save which is given below

4.Now,enter a title that describes your wall and you can also add upto 3 tags

5.Click save.

6.Now you will see a link below like this

7.Select it and share over your wall.

Thats it.Your fake wall is ready now.Whenever people will see it on your wall they will be amazed to see this prank.And everybody will definitely love it.

So,this was all about "Creating fake facebook wall". I hope you really enjoyed this article.At any point if you are facing any problem,please comment,i will reply immediately.Please dont forget to like and share this article on social media.Thanks.
The Wall Machine is a WYSIWYG tool for creating Funny Fake Facebook Walls, news feeds and conversation
The Wall Machine is a WYSIWYG tool for creating Funny Fake Facebook Walls, ne
Create fake profile pages just for fun. This fake facebook wall generator allows you to create a funny profile to en
Read More..

How to Clean a Laptop Screen

Be careful when attempting to clean a Laptop screen or LCD monitor as there are many chemicals that can damage the finish of a Laptop screen or LCD monitor. In addition, you should ensure that the fabric used in conjunction with the chemical is not too abrasive or harsh or you risk scratching the screen surface. In the following simple solution, I will show you what I personally use to clean my LCD screens.

Chemicals to use to clean a Laptop Screen:

DO NOT USE: Rubbing alcohol in any concentration

Although it has been mentioned that 91% pure alcohol is safe for LCD monitor cleaning, I strongly suggest avoiding it. There are many different plastic protective surfaces used on the market and some are NOT tolerant of alcohol. In addition, it can extensively dry out the surface and cause other issues down the road.

DO NOT USE: Windex or other ammonia based products

Ammonia will, over time, gradually eat away at the composition of the screen causing it to become brittle, yellow and eventually crack.

DO USE: Water for mild cleaning and dust removal

DO USE: 50% water and 50% vinegar mixture

A vinegar and water mixture can be used to remove water spots, pop stains, splashes and streaks and smudges from your flat screen without doing harm to the surface.

Tip: Some eyeglass cleaning kits use a vinegar/water solution.

Fabric to use to clean a Laptop Screen:

DO NOT USE: Newspaper, tissue paper or toilet paper

Newspaper, tissue paper and toilet paper contain wood fibers that can easily scratch the surface.

DO USE: Microfiber cloths

Microfiber cloths are typically included with new laptops. They are also commonly used to clean eye glasses and are safe to use on a Laptop or LCD screen surface.


Cleaning a Laptop or LCD Screen:


  1. Find a Microfiber cloth to use for cleaning
  2. Gently wipe the screen surface clean using the microfiber cloth
  3. Mix 1 part of water to 1 part of vinegar in a spray bottle
  4. Spray a mist of the water/vinegar solution onto your microfiber cloth
  5. Using the misted microfiber cloth, gently wipe the screen surface. Go against streaks to remove them, Use a swirling motion to remove spots or splatter marks.


http://www.lancelhoff.com/how-to-clean-a-laptop-screen/
Read More..

Surface 2 Video Converter Convert SD HD Videos to Surface 2 on Windows 8 1 8

Summary: Surface 2 HD Videos and Movies Playback solution - Just Convert MKV, VOB, Divx AVI, Tivo, WMV, MTS, MXF, M2TS, FLV, F4V, 3GP, M4V to Surface 2 video format. Then transfer converted video to Surface 2 for playing. Following is this full guide.

The Surface 2 equipped with 10.6 inches 1920*1080 display, and it has 32GB or 64GB version, so it is great to copy videos or music to Surface 2 for playback. Surface 2 runs windows RT operating system, the video formats supported by Surface 2 is limited. Lets take a look at Surface 2 supported file types:


So you cant play MKV, VOB, Divx AVI, Tivo, WMV, MTS, MXF, M2TS, FLV, F4V, 3GP, etc. videos on Surface 2 directly. Well, how can we play MKV, VOB, MPG, Tivo, MTS, FLV/f4v on Surface 2? there is an easy way to fix the issues. The best way is to convert these Videos and Movies into Surface 2 compatible format like MP4 format. Pavtube Surface 2 Video Converter is your best choice. It has easy quick interface, and great final file quality. (Mac users: Surface 2 Video Converter for Mac.)

Now you can follow the easy steps below to convert various videos/movies to Surface 2 support format for playback.

Fistly download and install the right vertion:


(Note: free download a dmg file for Mac OS X 10.5 Leopard users.)

Step 1. Load video files.

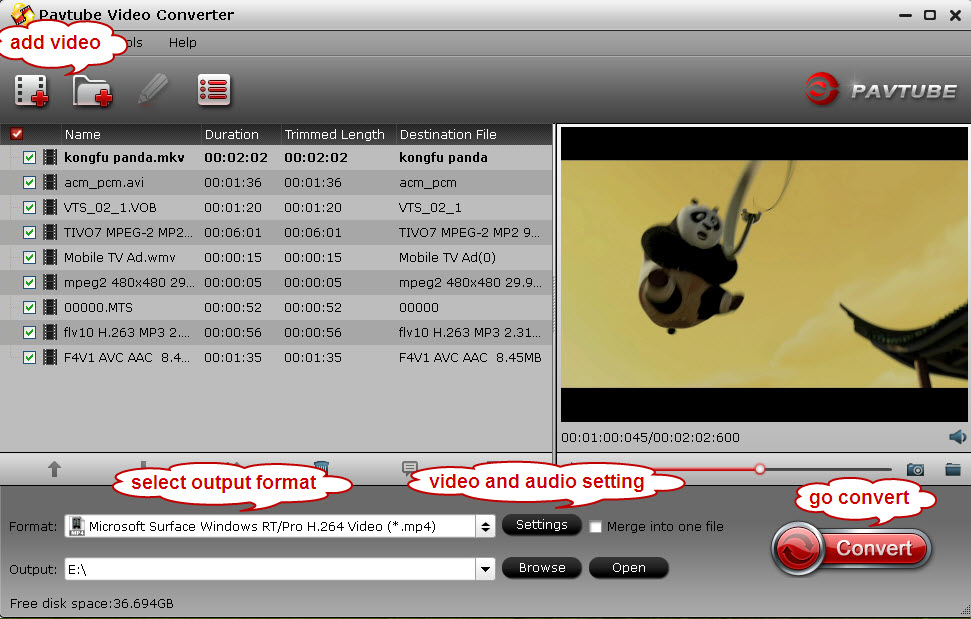
After downloading, install and run the Surface 2 Video Converter on your PC, then click "Add videos" or "Add from folder" to import your source videos. Pavtube Surface 2 Video Converter support batch conversion.

surface 2 video converter

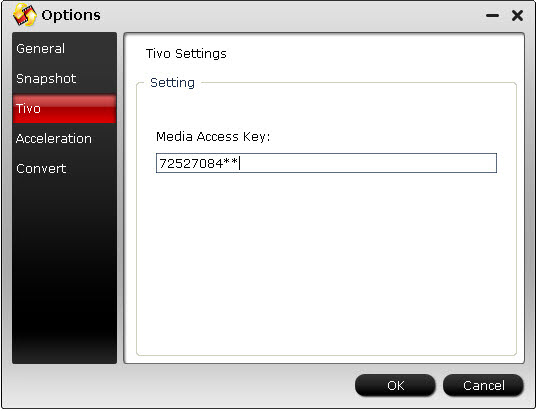
Note: when load tivo file to Pavtube Video Converter, The program will ask you to enter you Media Access Key, Do as the program requires, and then click ok to continue.


2. Choose H.264(*.mp4) as Surface 2 most compatible format.

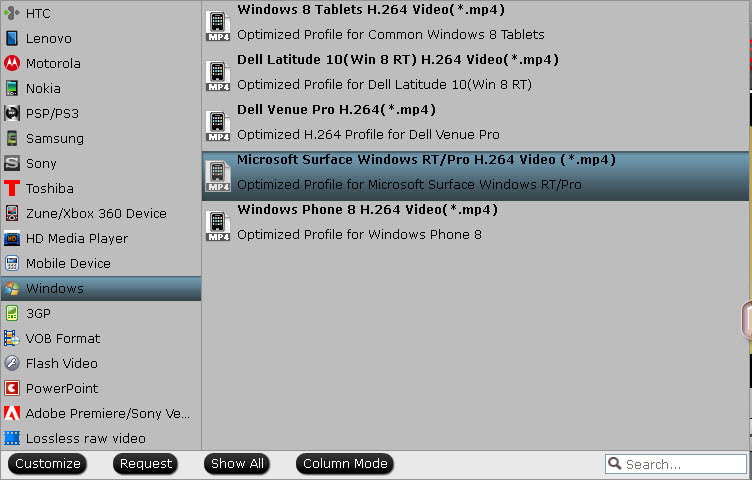
Click "Format" bar and you can easily find the optimized videos for Surface 2 under Windows > Microsoft Surface Windows RT/Pro H.264 Video (*.mp4). The output videos could fit on your device perfectly.


Tip: If you like, you can click "Settings" to change the video encoder, resolution, frame rate, etc. as you wish. According to my experience, the file size and video quality is based more on bitrate than resolution which means bitrate higher results in big file size, and lower visible quality loss, and vice versa. For watching HD videos on Surface 2, 720p with 2000~2500kbps is just all right.

When the above mentioned steps finished you can click the big red "Convert" to start converting MKV, AVI, VOB, MPG, Tivo, WMV, MTS, M4V, FLV/F4V to Surface 2 MP4 at fast speed with CUDA/AMD acceleration technology support.

Note: Before the conversion, you can edit your videos by trimming, cropping, adding watermarks, inserting subtitles and more to get the exact effect and feel you want. (Click the "Edit" button to open the video editing window, where you can perform the operations.)

After the conversion, click "Open output folder" in conversion window or "Open" in main interface to get the generated mp4 files and transfer them to your Surface 2 for joy. Enjoy!

Is it very easy and convenient? In this way, you can also converting MKV, VOB, MPG, Tivo, MTS, FLV/F4V videos toiPad AiriPhone 5S/5CiPad 3Galaxy Tab 3Galaxy Note 3Sony Xperia Z1, etc.

To enjoy all the HD videos, Blu-ray movies and DVDs on your Surface 2, a professional all-in-one program is the key. Pavtube Video Converter Ultimate is highly recommended here with its easy, clear and impressive features. If you are running a Mac OS X computer, iMedia Converter Mac is the definite option. (Now both are 20% off on Pavtube Thanksgiving Promotion 2013 column, it will be expired on Dec. 10, 2013.)


Related Articles: 

Source: How to transfer MKV, AVI, VOB, Tivo, WMV, MPG, MTS, FLV/F4V videos to Surface 2?
Read More..

How to Reset Canon MP800 MP820 MP810 MP830 MP960 MP970

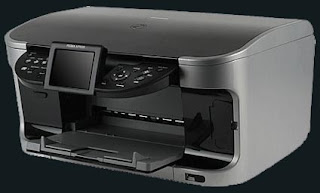
Printer Canon MP800Below the instruction to reset Canon MP800, MP820, MP810, MP830, MP960, MP970

  1. Start with printer off
  2. Press and hold resume Button (triangle in the circle) and click “Power” button. green led should be on
  3. While holding the Power button, release the Resume Button.
  4. Without releasing the Power Button, click “Resume” button for two times and release Both Buttons.
  5. Click “Resume” for four times then soon click “Power” button, to confirm the selected action (reset counter absorber).
  6. Turn off the printer and turn on again
Read More..

How to Change Windows 7 Folder Background

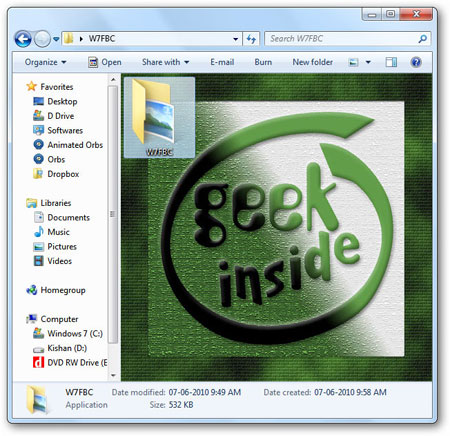
Are you Windows 7 users? If you are bored with the folder background on your Windows 7 don’t be worry, you can change it so look beautiful.
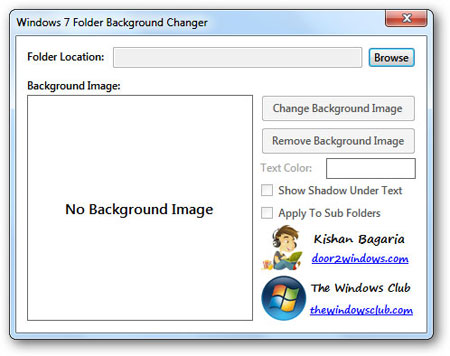
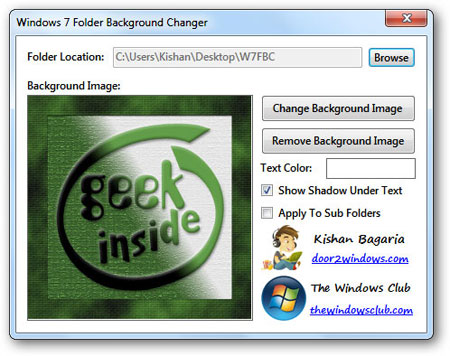
Tricks-collections.com would be share how to change your Windows 7 folder background, a lot of tricks that can use to change Windows 7 folder background, one of them is Windows 7 Folder Background Changer, this application is a free tiny portable tool that allows you to change any folder’s background & text color in Windows 7/Vista. Currently the latest version for Windows 7 Folder Background Changer is 1.1.
Please follow the steps below to start use this application:
  1. Run the tool as administrator. If you have run this tool for the first time then it will restart Explorer.
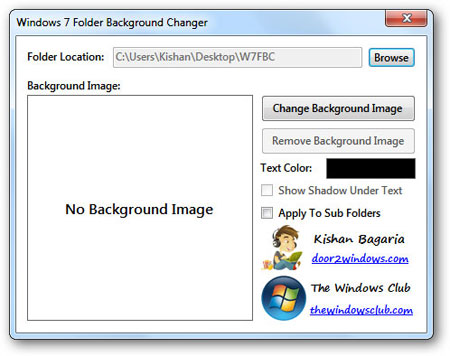
  2. Click on Browse and browse for the folder of which you want to change the background/text color.
    How to Change Windows 7 Folder Background 2
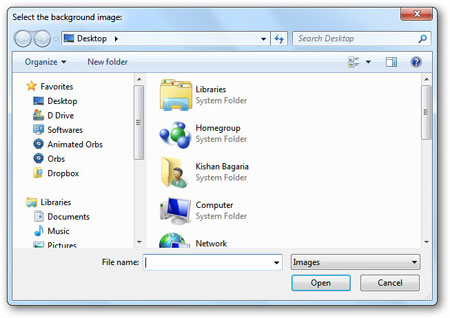
  3. Click on Change Background Image and browse for the image that you want to set as the background of the folder.
    How to Change Windows 7 Folder Background 3
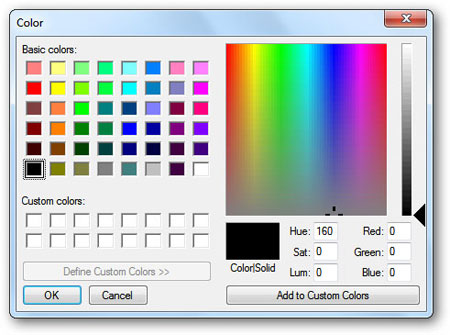
  4. Click on the Black color rectangle and select the color that you want to set as the text color of the folder.
    How to Change Windows 7 Folder Background 4
  5. If you want to display a shadow under the text of all the items in the folder, select Show Shadow Under Text. This option will only work with icons view.
  6. If you want the style of this folder to be applied to all the sub-folders, select Apply To Sub Folders.
    How to Change Windows 7 Folder Background 5
    How to Change Windows 7 Folder Background 6
If you interested to use this application you can download it here
Read More..

How to Turn Your Laptop Into JARVIS From Iron Man !


Turn Your Laptop Into J.A.R.V.I.S From Iron Man.

Turn your laptop into super smart Jarvis in 15 Minutes :

You have probably heard about the Iron Man Personal Assistant, aka J.A.R.V.I.S, you would have wondered if you could convert your laptop/desktop into a full featured robotic assistant,you could do it.And it is pretty easy. Although you might not be able to launch missiles and deploy security armor, you can do easy tasks like asking for weather, shutting PC down, pimp its interface etc etc...

So Lets Get It Started,What Do You Need :

  • # Windows 7 or 8 ( 7 is just great, 8 will work, vista & XP will not work )
  • # Windows Speech Recognition Macros. https://dl.dropbox.com/u/2362886/WSRMacros.msi
  • # A Bluetooth/Wireless Headset With Mic (optional) or a Laptop
  • # JARVIS Theme. (read below)

So That You Dont Get Confused :

We have divided the "convert-to-jarvis" mission into 3 Divisions :
- Training The Windows Speech Recognition Program.
- Setting Up The Windows Speech Macros.
- Setting Up The J.A.R.V.I.S Interface.


Step One : Train Your Windows Speech Recognition Program : 5 Minutes :

Yeah I Know, A Basic Step, But The Most Important part of "convert-to-jarvis" mission, what you gotta do is fire up the windows speech recognition program, which comes pre-installed with the Windows, way to access it is via start bar. Now choose the required Fields,and after it is done, visit the "Train your computer to better understand you" section, it is not necessary for people with clear voice/accent, but I strongly advise you to spend at least 5 Minutes on this so your computer can understand you better.


Step Two : Setting Up The Windows Speech Recognition Macros : 5 Minutes :

Now if you Have set-up-ed the Windows Speech Recog Program, you would have been trying out all sorts of cool commands, But now to spice it up, Well use the Windows Speech Macros.I assume you would have already downloaded it from the link above and installed it.After Installing it i would advise you to put its shortcuts in two places, One in the desktop and other in the start-up folder, so it would start the second your computer boots up.So a little walk through to this software, This is a super-cool, little software that teaches your computer to talk to you interactively.Here is how to set up the commands :
Double Click The Macros Icon, and when the window pops up asking "What should the macro do?" click "Advanced." For those of you familiar with creating websites, this should be a welcome site. WSRM uses XML for commands... which makes creating custom commands relatively simple. For those of you who arent aware of XML, its still easy.Here Is A Little Sypnosis at what are you looking at :

<speechMacros> - This is the starting Tag, it just tells the computer that this XML file uses the Speech Macros to execute.

<command> - This is the command to be executed. Each command is basically one action... in most cases you will only need one, but for some automations youll want to include more than one. Youll see an example of this later.

<listenFor></listenFor> - This tells the computer what word or phrase to listen for in order to do an action. Notice that there is a closing tag (</listenFor>), this tells the XML that this spot in the code is where to stop doing whatever function... in this case stop listening for a word or phrase once the computer hears it.

</command> - The closing tag for the "Command" tag... again, in XML every tag will have an opening/closing tag and what happens between the two is how it knows what to execute. In this case it knows that the command is finished once the word/phrase has been detected.

</speechMacros> - By now I think you can figure out why this is here.

Since Im going to name my computer Jarvis, Im going to tell my computer to listen for its name by changing the <listenFor> tags to say the following : <listenFor>Jarvis</listenFor>

Here Is A Little Applet That will teach my laptop to Reply Me :
_________________________________________________________________________________
<speechMacros>
<command>
<listenFor>Wake Up Jarvis</listenFor>
<speak>Systems Online, Database Check, Good Morning Sir !</speak>
</command>
</speechMacros>
_________________________________________________________________________________

So Whenever I Say "Hey Jarvis" My Computer will reply me with "System Online,Database Check, Good Morning Sir ! ", You can change it to whatever you like !

An Speech Macro For Getting The Weather :
_________________________________________________________________________________

<?xml version="1.0" encoding="UTF-16"?>
<speechMacros>
<command>
<listenFor>Pull up the weather in [CityName]</listenFor>
<run command="http://www.weather.com/weather/local/%7B[CityName.zipCode]%7D"/>
</command>
<command>
<listenFor>Is it cold in [CityName]?</listenFor>
<speak>Let me check... just a moment.</speak>
<script language="JScript">
<![CDATA[
<var xml_doc = new ActiveXObject("Microsoft.XMLDOM");
<xml_doc.async = false;
<xml_doc.load("http://www.rssweather.com/zipcode/%7B[zipCode]%7D/rss.php");
<var titles = xml_doc.getElementsByTagName("title");
<var descriptions = xml_doc.getElementsByTagName("description");
<Application.Speak(titles.item(2).text + " in {[*CityName]}");
<Application.Speak(descriptions.item(2).text);]]>
</script>
</command>
<listenForList name="CityName" propname="zipCode">
<item propval="65201">Columbia</item>
<item propval="37201">Nashville</item>
</listenForList>
</speechMacros>
_________________________________________________________________________________

A Macro To Restart The Computer :
You will just have to say "Nuke It!" and the computer will restart :
_________________________________________________________________________________

<speechMacros>
<command>
<listenFor>Nuke it</listenFor>
<speak>Rebooting The System.</speak>
<run command="C:WindowsSystem32shutdown.exe" params="-r -t 00"/>
</command>
</speechMacros>
_________________________________________________________________________________

Another One To Shut Down The Computer :
You will have to say "Goodbye Jarvis" And the Pc Will Shut Down :
_________________________________________________________________________________

<speechMacros>
<command>
<listenFor>GoodBye Jarvis !</listenFor>
<speak>Getting Offline,Bye Sir</speak>
<run command="C:WindowsSystem32shutdown.exe" params="-s -t 00"/>
</command>
</speechMacros>
_________________________________________________________________________________

Download This Pretty Little App And Extract It To C:NIR and you will add more intelligence to your PC :

Volume Up:

<speechMacros>
<command>
<listenFor>volume up</listenFor>
<run command="C:
ir
ircmd.exe" params="changesysvolume +5000"/>
<speak>Volume Up</speak>
</command>
</speechMacros>
_________________________________________________________________________________

Volume Down:

<speechMacros>
<command>
<listenFor>volume down</listenFor>
<run command="C:
ir
ircmd.exe" params="changesysvolume -5000"/>
<speak>Volume Down</speak>
</command>
</speechMacros>
_________________________________________________________________________________

Volume Medium :

<speechMacros>
<command>
<listenFor>volume medium</listenFor>
<run command="C:
ir
ircmd.exe" params="setsysvolume 30000"/>
<speak>Volume at medium listening level</speak>
</command>
</speechMacros>
_________________________________________________________________________________

For More Interactivity, install Voice Search on Google chrome or some similar app in firefox !

Step Three : Pimping The Interface : 5 Minutes :

So well we have completed the talking and replying part, but we dont need the old crappy windows desktop, we need a kick ass interactive desktop so our computer looks like jarvis, to do that we will install this theme from Devianart.

http://hell999.deviantart.com/art/IronMan-Jarvis-Theme-Download-259211144

After that we will need to pimp up the start of windows, to do that we will download this little utility called Bootchanger

http://hell999.deviantart.com/art/IronMan-Jarvis-Theme-Download-259211144

and getting a boot screen animation of your choice form here

http://windows7bootscreens.com/

then you are done.

Welcome To Jarvis !

So Whats Next ? We think using RFIDs tags and attaching CCTVs cameras to it. We could also connect arduino and sub computers to control lightning and other electronics component, We could also add a IR Receiver to add remote functionality ! What do you think we could do next ?

Drop your comments below please; You feedback can lead to bigger & better posts  ^_^


COMMENTS:

Read More..

Rip Move Blu ray movies to Galaxy Tab 3 10 1 8 0 on Windows Mac

Want to copy Blu-ray contents to Galaxy Tab 3? How to remove Blu-ray protection and playback Blu-ray on Galaxy Tab 3 10.1/8.0? This Blu-ray to Galaxy Tab 3 converter is highly recommended to help easily remove commercial Blu-ray protection and output MP4 videos for freely playback.
 
“Move Blu-ray movie to Galaxy Tab 3: I recently purchased a Galaxy Tab 3 (10.1 version) and I can’t play Blu-ray disc on Galaxy Tab 3, how can I get my favorite Blu-ray contents on my new Galaxy Tab 3 10.1? How to transfer movies from Blu-ray Disc to Galaxy Tab 3? What should I do?”

“Hey, I just ordered a new Samsung Blu-ray drive and some Blu-rays like Life of Pie, The Hobbit, etc., but it’s too hard to keep them clear…my kids always mess up all my collections. Is there anyway I can keep the digital copy and share them with my family on portable devices? I’m also going to preorder a Galaxy Tab 3 soon. Thx!”

Maybe you also decide to preorder a Galaxy Tab 3 (10.1 inch or 8.0 inch) but don’t know how to watch your Blu-rays on it without limitation. However, Samsung Galaxy Tab does not carry a disc drive so that Blu-rays are not supported directly. Besides, most commercial Blu-rays are encrypted by film studio so that they cannot be copied. Though we are facing these difficulties, it’s still not an impossible task for watching Blu-rays on Galaxy Tab 3.

watch blu-ray on galaxy tab 3

What we need:?

  • An external Blu-ray Disc drive
  • Blu-ray Ripper tool – Pavtube Blu-ray Ripper (Mac users: Blu-ray Ripper for Mac) - a top and all-in-one Blu-ray Ripping program to help you remove Blu-ray protection and convert Blu-ray to Galaxy Tab 3 support format. ( now is 30% off, save $14.7, last 4 days!)


System requirements:

Windows
  • Operating System: Windows XP/2003/Vista/Windows 7/Windows 8
  • DirectX Version: 9.0 or above
  • Memory: 64MB at least
  • Processor: 500MHz Intel or 500MHz AMD CPU
  • Hard Disc Space: 512MB or above
  • Optical Drive: DVD drive(BD drive is required for ripping Blu-ray disc)

Mac
  • 1G Hz or above Intel processor.
  • Mac OS X Leopard (10.5), Snow Leopard (10.6), Lion (10.7), Mountain Lion (10.8), Mavericks (10.9)
  • 512 MB physical RAM (memory) or more.
  • 1024*768 or higher resolution display.
  • Optical Drive: DVD drive(BD drive is required for ripping Blu-ray disc)

Follow this guide to quick learn:

How to convert Blu-rays to Galaxy Tab 3 (10.1/8.0)?


Step 1: Load Blu-ray movie to the Blu-ray to Galaxy Tab 3 Converter.

Insert your Blu-ray movie to disc drive, and click “Load Disc” button on Pavtube Blu-ray Ripper interface to load Blu-ray from ROM; it also support importing Blu-ray ISO and Blu-ray folder.

pavtube blu-ray ripper for galaxy tab 3

Step 2: Select video format.

Samsung Galaxy Tab 3 supported video formats: H.263, H.264, MPEG4, WMV, DivX.
Here we select MP4 with H.264 codec for Galaxy Tab 3. Click the Format drop-down list, and select “Samsung Galaxy Tab 3 Video(*.mp4)” from Samsung category. 

Tips: If you have special requirements on target video, click “Settings” to customize video size, bitrate, frame rate and sample rate.

Step 4. Ripping Blu-ray to MP4 for Galaxy Tab 3.

Click the red “Convert” button to start ripping Blu-ray to H.264/MPEG-4 MP4 for Galaxy Tab 3. When it finishes, click the “Open Output Folder” icon to quick locate the converted video.

Once get the converted videos, just copy and dump them to Galaxy Tab 3 via USB. Then you are ready to play iTunes movies on Galaxy Tab 3 freely.
 
Related Articles

Thanks for reading this guide.
Read More..

Enable Galaxy Tab 3 to play MKV AVI VOB Tivo MPG WMV FLV F4V video without any limitation

This guide helps you to easily transfer SD/HD videos (MKV, AVI, VOB, Tivo, MPG, WMV, MOV, M4V, VRO, FLV, F4V Videos) to Samsung Galaxy Tab 3 in best video quality.

Samsung Galaxy Tab 3 become one of the most remarkable multimedia devices again Apple iPad this year. It comes with a 1280*800 TFT LCD display and a powerful 1.6GHz dual-core CPU for effective graphics processing. With such a portable device in hand, watching videos could be a great enjoyment especially when you want to share videos with family anywhere without device limitation.

But as most other Android tablets, Galaxy Tab 3 is still not able to support most video formats such as MKV/AVI/VOB/Tivo/MPG/WMV/MOV/M4V/VRO/FLV/F4V unless you convert them to Galaxy Tab 3 preferred MP4 format.

put and play hd videos on galaxy tab 3

How to convert MKV/AVI/VOB/Tivo/MPG/WMV/FLV/F4V to Galaxy Tab 3?

Preparation:
  1. Your Galaxy Tab 3 10.1 or Tab 8.0
  2. Your favorite Videos or Movies
  3. A Professional Galaxy Tab 3 Video Converter is a professional video to Galaxy Tab 3 conversion program which support most mainstream video formats, and convert them to perfect video size and format for playback on Galaxy Tab 3 10.1/8.0. (Mac users: Mac Video Converter for Galaxy Tab 3)

Download a free trial version:


Step 1. Import source videos to the Video to Galaxy Tab 3 Converter.

Install and run the best Video to Galaxy Tab 3 converter on your computer. Add videos in the following two ways:

1. Click “Add video” button to choose video files from your hard drive for converting. 2. Directly drag the videos to the Galaxy Tab 3 Video Converter.

Tips: To save your time, you can add multiple video files for converting at a time since batch conversion is well supported.

video to galaxy tab 3 converter

Step 2. Choose presets for Galaxy Tab 3.

Click the “Format” list to check all the profiles. This Video to Galaxy Tab 3 Converter integrates various presets for different devices; click “Samsung” on the left column to find MP4 presets for Galaxy Tab 3. Or you can key in “galaxy tab” in the little search box to get all the presets specific for Galaxy Tab 10.1, Galaxy Tab 2 7.0, Galaxy Tab 3 and more:
  
Step 3. Edit video and customize specs before conversion. (Optional)

You can edit these videos before conversion by clicking the pencil-like icon on the top. Some of the source video such as MXF/MTS/MKV could be interlaced which is not good for playback; in this case you can check “Deinterlacing” in Effect tab to get perfect progressive HD MP4 videos. Trim, crop, edit audio, add srt/ass/ssa subtitles and 3D effect are all supported in this edit window.

Back to main interface, you can click Settings to free customize video size, bitrate(quality), frame rate, sample rate and other specs.

Step 4. Start converting all Videos for Galaxy Tab 3.

Click the red “Convert” to start converting MKV/AVI/VOB/Tivo/MPG/WMV/FLV/F4V to Galaxy Tab 3 MP4.

Wait for a few moments, and you can click “Open output folder” to locate the converted video quickly. Now you can transfer videos to your Galaxy Tab 3 for entertainment. (Learn more: How to transfer videos from PC to Galaxy Tab with Kies?)


Good news: 

The Pro version of Video Converter – Video Converter Ultimate now on 20% OFF! It’s not only able to convert all SD/HD videos but also capable of legally removing Blu-ray/DVD protection and put Blu-ray/DVD/ISO/IFO movies on your Galaxy Tab 3, iPhone 5S, iPhone SC, Galaxy Note 3, Sony Xperia Z1, LG G-Pad, Surface RT/Pro and more other devices. (Here is a guide of best Vdieo Converter Ultimate for Galaxy Tab 3: How to Put 1080p Video, Blu-ray and DVD Movie to Galaxy Tab 3?)


You may also interested in Money-saving bundles from Pavtube Special Offer page:
. . . . . .
Read More..

Titanics Keys to the Past


Dive into adventure in Titanic's Keys to the Past! Join Lillian as she travels to the opening of the world’s first ocean-floor museum. Jump between the present and past as you help her discover the Titanic’s mysteries and get closer to unveiling the truth behind the disaster that took her great-grandmother’s life 100 years ago. Are you prepared to uncover the truth behind the Titanic’s fateful voyage?


DOWNLOAD LINK »
Read More..

PuppetShow 4 Return to Joyville Collectors Edition


Travel back in time to help stop a terrible fire that started Felicia down her destructive path in PuppetShow: Return to Joyville! This time traveling adventure takes you back to Joyville when Felicia was a small child. With the help of Felicia, try to stop the fire that incinerated her father’s theater. This fire horribly burned Felicia, and caused her to turn evil. By changing the past, Felicia hopes for a chance at redemption. Discover who the true villain is in this captivating adventure!

DOWNLOAD LINK »
Read More..

Cake Mania To the Max for PC

Flashback to the neon-soaked 80s and help Jill prepare for the biggest night of her young life in Cake Mania: To the Max, a fun Time Management game! Like most high school students in the Bakersfield High Class of ‘89, Jill doesn’t have a clue as to what she wants to do with the rest of her life. As she fretfully contemplates various schools and career paths, her Grandpa presents her with the opportunity of a lifetime – design the centerpiece cake for her upcoming prom!
DOWNLOAD LINK »
Read More..

10 Days To Save the World The Adventures of Diana Salinger


You only have 10 Days to Save the World! Find the secrets of an ancient amulet to stop flooding in Venice, a drought in Africa and the other disasters occurring all over the planet. Travel around the globe as you help Diana track down her father and explore the mysteries of the timeless amulet in this exciting Hidden Object game. Can you end the cataclysmic events and save the entire planet from destruction?

DOWNLOAD LINK »
Read More..

Angry Birds Seasons v 2 5 0 Back to School for PC


Pencils, apples, backpacks, playgrounds -- it's back to school time! But summer's not over yet: we've got some spectacular surprises in store! Brighten your day with 20 brand new schoolyard levels, new bonus levels, and a BRAND NEW BIRD. Puzzle through TWENTY brand-new school levels! Say hello to the UPLIFTING new bird! She's cute, pink, and bubbly -- but watch out, this girl is no pushover! Groove to the new theme music in the fun new playground levels!

DOWNLOAD LINK »
Read More..